Photography
Author: DerAndere
Here you will find tips revolving around digital photography and image manipulation.
Here you will find tips revolving around digital photography and image manipulation.
Content
1 Equipment
1.1 Smartphones that can save images in DNG or RAW format
1.2 affordable cameras supporting the RAW format
1.3 compact mirrorless system camera - do you need it?1.4 Lenses
1.5 Filters
2 Camera settings - Transition from automatic mode to manual settings
3 Image processing
3.1 RAW-processing using the open-source software darktable
4 Enabling RAW photography on consumer class, compact point-and-shoot cameras
4.1 Enabling RAW photography on cameras of the Nickon Coolpix series
4.2 Enabling RAW photography on Canon's compact point-and-shoot cameras
HTC One A9 (239 € new)
HTC One M9 (256 € new)
LG G4 (260 € new)
Google/LG Nexus 5X (265 € new with third party app)
Sony Xperia Z5 (with third party app) (285 € new)
LG V10 (330 € new)
OnePlus 5 A9
ASUS Zenfone 3 Zoom
ASUS Zenfone Zoom S
Samsung Galaxy S6 Edge / S6 Edge+
Samsung Galaxy Note 5
Motorola X Style / Pure with third party app
Apple iPhone SE, iPhone 6s, or newer with iOS10 or newer (with third party app)
Apple iPhone X or newer
Panasonic Lumix DMC LX5 (short: Lumix LX5)
Nickon Coolpix series (only after firmware hack, see section 4.1)
Canon's compact point-and-shoot cameras (only after firmware hack, see section 4.2)
The second great thing for 2018 is that the most advanced open source RAW processor darktable now became cross-platform Software: Together with version 2.4.0 (what a great Christmas gift!), a port to Microsoft Windows port was released. So in the following sections, I am going to explore the processing of RAW images using darktable.
A copy of the original .RF2 (RAW) file, opened in darktable:
First set the desired aspect ratio in the options for this tool in the right area of darktable. Crop by draging the handles in the edges and corners of the image.
In the final state it looks like in figure:
After closing the crop tool, the cropped image will be automatically zoomed to fit the canvas:
In the options of the white balance tool, one can select the camera preset or some scene-specific presets delivered with darktable. Alternatively one can set the colour temperature as desired. Selecting the preset "spot", "indoor" and "daylight" give lower colour temperature (higher blue component). "Outdoor", "cloudy" and "incandecent" give increasingly higher colour temperature (higher red). The slider "colour temperature" sets the correlated colour temperature of the ambient lighting in the scene (the principle behind it is black body radiation):
In figure 3.5 I temporarily disabled highlight restauration to show what that feature does: After white-balancing an image, regions where the camera sensor was saturated (resulting in clipping of the respective pixels) are shown in magenta. With highlight restauration enabled, these regions are shown in pure white.
I will now show different ways to set contrast and brightness. Inspection of the the histogram helps fine-tuning. As a rule of thumb, it makes sense to set the black and white points so that the histogram is stretched so that it covers most of the scale while under optimal conditions, no clipping occurs. In contrast to other operations that will be discussed later, exposure is a nonlinear operation. That means that different from the following operations, this does not preserve relative pixel values. This operation alters highlights and shadows more than it does mid tones. It approximates the result one would have obtained by taking the photograph with a different initial in-camera-exposure setting (see section 2 on this page):
Adjusting the tone curve is the most flexible way of adjusting tones and pixel values. I recommend to start by keeping it linear with the interception of the axis at the origin (at 0) and and only change the slope for the beginning. In automatic mode, changing the lightness (L) curve gives quite different results compared to other operations:
Changing the slope of the linear luminocity "curve" while the mode in the tool's options is set to "automatic in RGB" is very similar to changing exposure:
Exactly the same result is obtained by changing the white-point:
Alternatively, the white point can be set under "basic operations" by using the tool "raw black / white point":
The extreme contrast stretching amplified noise, so I decided to add denoise. I started by choosing "denoise (profiled)" in the mode "non-local means":
In the mode "wavelet", denoising gives more pronounced results:
Finally I tried to sharpen the image using different settings. Radius = 1, amount = 1:
Radius = 2, amount = 1:
Radius = 2, amount = 2
The different extend of sharpening is clearly visible. The final image is ideally exported lossless as an 16 bit image in the tagged image file format (TIFF) without compression. At this point my first tutorial ends. Good luck with your RAW image processing.
Link2
A less intuitive alternative is the open source KNIME Analytics Platform with KNIME image processing (KNIP) and other image processing plugins that were contributed by the community. The advantage of KNIME is that also plugins for drug discovery data mining and molecular structure / reaction drawing are available.
1 Equipment
1.1 Smartphones that can save images in DNG or RAW format
3 Image processing
3.1 RAW-processing using the open-source software darktable
1 Equipment
[Werbung ohne Auftrag / unpaid advertisement]1.1 Smartphones that can save images in DNG or RAW format
Since Google's operating system Android 5.0 "Lollipop" was released in 2015, more and more smartphones can save pictures in the DNG format (or RAW format). This allows non-destructive post processing of pictures to be made. Now the only thing that keeps photographers from using their smartphones instead of their system camera all the time is the limitation of smartphone camera optics. Here is an incomplete list of smartphones that support the DNG / RAW format:HTC One A9 (239 € new)
HTC One M9 (256 € new)
LG G4 (260 € new)
Google/LG Nexus 5X (265 € new with third party app)
Sony Xperia Z5 (with third party app) (285 € new)
LG V10 (330 € new)
OnePlus 5 A9
ASUS Zenfone 3 Zoom
ASUS Zenfone Zoom S
Samsung Galaxy S6 Edge / S6 Edge+
Samsung Galaxy Note 5
Motorola X Style / Pure with third party app
Apple iPhone SE, iPhone 6s, or newer with iOS10 or newer (with third party app)
Apple iPhone X or newer
1.2 affordable cameras supporting the RAW format
With prices for memory being at the current level and even smartphones featuring RAW support, there is no excuse for not shooting photos in the RAW format. Most cameras can be set to save each photograph in the compressed JPEG format and versatile DNG / RAW-format in parallel to get the best of both formats. The following table lists affordable cameras that support the saving of images in RAW format:Panasonic Lumix DMC LX5 (short: Lumix LX5)
Nickon Coolpix series (only after firmware hack, see section 4.1)
Canon's compact point-and-shoot cameras (only after firmware hack, see section 4.2)
1.3 compact mirrorless system camera - do you need it?
text1.4 Lenses
text1.5 Filters
text2 Stepping up from automatic mode: Camera settings
text3 Image processing
Photographers that support the idea of open source software, like I do, will be really happy in 2018: The GNU image manipulation program will become a usable alternative to Krita and ImageJ: All the missing core features (32 bit depth, color management, linear workflow and raw processing plug-ins) will be supported, finally. And it is only 45 critical bugs short from being released.The second great thing for 2018 is that the most advanced open source RAW processor darktable now became cross-platform Software: Together with version 2.4.0 (what a great Christmas gift!), a port to Microsoft Windows port was released. So in the following sections, I am going to explore the processing of RAW images using darktable.
3.1 RAW-processing using the open-source software darktable
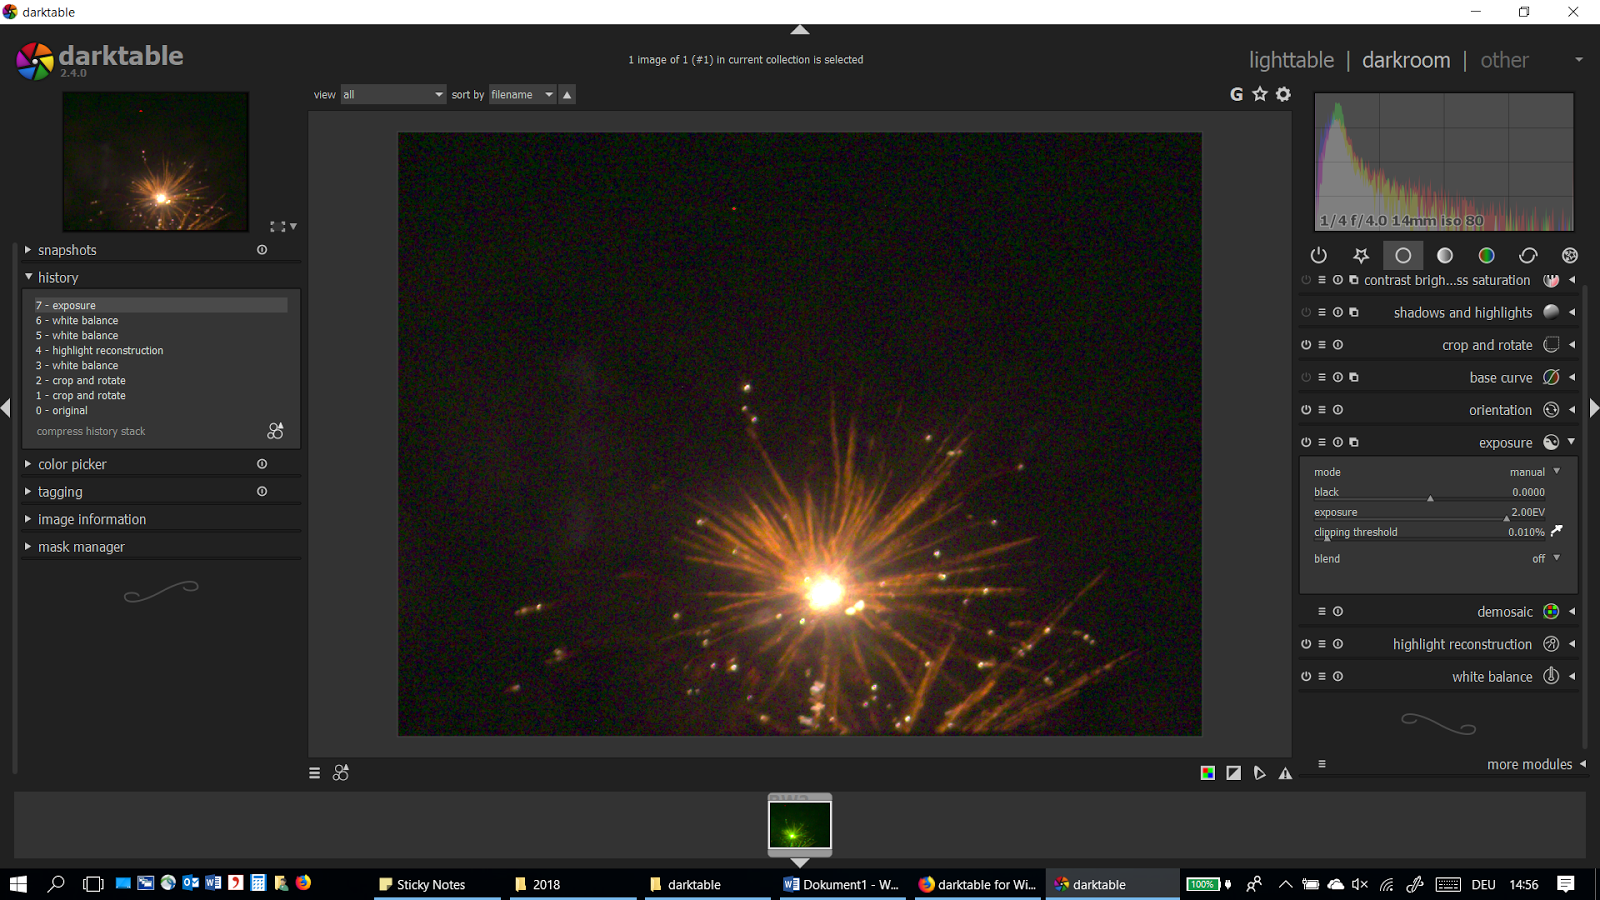
Since the open source program darktable is now available for all operating systems, I will teach you (and myself) how to use it for processing RAW-images. It can process images in the formats TIFF DNG or RAW. All internal processing is now done with the highest possible precision (32bit per channel floating point precision) and most processing is done in CIE-Lab color space. It is also the best program for radiometrically correct image processing. In order to make use of this powerful software, you need a camera that supports a DNG or RAW format. You can get yourself one of the smartphones or cameras that I reviewed in section 1 of this page and set it to save images in the DNG or RAW format. Always keep one unchanged file as a backup and use a copy of that file to apply changes. There are many tutorials out there, but they often start with already near-to-perfect RAW images. In my tutorial I will use an ugly original RAW image as a starting point in order to better see the results of my editing. The original photograph was taken with a Panasonic Lumix LX5 using the scene preset "fireworks" which resulted in the following settings: ISO = 80, aspect ratio = 4:3, exposure =....A copy of the original .RF2 (RAW) file, opened in darktable:
 |
| Fig. 3.1: copy of the original .RF2 (RAW) file, opened in darktable. The photograph was taken with a Panasonic Lumix LX5 using the scene preset "fireworks" which resulted in the following settings: ISO = 80, aspect ratio = 4:3, exposure =.... |
First set the desired aspect ratio in the options for this tool in the right area of darktable. Crop by draging the handles in the edges and corners of the image.
 |
| Fig. 2: After selection of the cropping tool, the image margins turn into handles. |
In the final state it looks like in figure:
 |
| Fig. 3.2: After dragging the handles of the cropping tool, the image is shown cropped. |
After closing the crop tool, the cropped image will be automatically zoomed to fit the canvas:
 |
| Fig. 3.3: After deselection of the crop tool, the cropped image gets resized to fit the canvas. |
In the options of the white balance tool, one can select the camera preset or some scene-specific presets delivered with darktable. Alternatively one can set the colour temperature as desired. Selecting the preset "spot", "indoor" and "daylight" give lower colour temperature (higher blue component). "Outdoor", "cloudy" and "incandecent" give increasingly higher colour temperature (higher red). The slider "colour temperature" sets the correlated colour temperature of the ambient lighting in the scene (the principle behind it is black body radiation):
 |
| Fig. 3.4: White balance preset "daylight" |
In figure 3.5 I temporarily disabled highlight restauration to show what that feature does: After white-balancing an image, regions where the camera sensor was saturated (resulting in clipping of the respective pixels) are shown in magenta. With highlight restauration enabled, these regions are shown in pure white.
 |
| Fig. 3.5: Temporarily disabled highlight restauration. |
I will now show different ways to set contrast and brightness. Inspection of the the histogram helps fine-tuning. As a rule of thumb, it makes sense to set the black and white points so that the histogram is stretched so that it covers most of the scale while under optimal conditions, no clipping occurs. In contrast to other operations that will be discussed later, exposure is a nonlinear operation. That means that different from the following operations, this does not preserve relative pixel values. This operation alters highlights and shadows more than it does mid tones. It approximates the result one would have obtained by taking the photograph with a different initial in-camera-exposure setting (see section 2 on this page):
 |
| Fig.3.6: Exposure adjusted. |
Adjusting the tone curve is the most flexible way of adjusting tones and pixel values. I recommend to start by keeping it linear with the interception of the axis at the origin (at 0) and and only change the slope for the beginning. In automatic mode, changing the lightness (L) curve gives quite different results compared to other operations:
 |
| Fig. 3.7: Linear Lightness tone curve with adjusted slope in mode "automatic". |
Changing the slope of the linear luminocity "curve" while the mode in the tool's options is set to "automatic in RGB" is very similar to changing exposure:
 |
| Fig. 3.8: Linear lightness tone curve with adjusted slope in mode "automatic in RGB" |
Exactly the same result is obtained by changing the white-point:
 |
| Fig. 3.9: White-point adjustment. |
Alternatively, the white point can be set under "basic operations" by using the tool "raw black / white point":
 |
| Fig. 3.10: Raw black / white point adjustment. |
The extreme contrast stretching amplified noise, so I decided to add denoise. I started by choosing "denoise (profiled)" in the mode "non-local means":
 |
| Fig. 3.11: Denoise (profiled) in mode "non-local means". |
In the mode "wavelet", denoising gives more pronounced results:
 |
| Fig.3.12: Denoise (profiled) in mode "wavelet". |
Finally I tried to sharpen the image using different settings. Radius = 1, amount = 1:
 |
| Fig. 3.13: Sharpen with radius = 1, amount = 1. |
Radius = 2, amount = 1:
 |
| Fig. 3.14: Sharpen with radius = 2, amount = 1. |
Radius = 4, amount = 1:
 |
| Fig. 3.15: Sharpen with radius = 4, amount = 1. |
Radius = 2, amount = 2
 |
| Fig. 3.16: Sharpen with radius = 2, amount = 2. |
4 Enabling RAW photography on consumer class, compact point-and-shoot cameras
text4.1 Enabling RAW on cameras of the Nickon Coolpix series
Link1 (french)4.2 Enabling RAW on Canon's compact cameras
Link1Link2
5 Processing and analysis of scientific data and grayscale / indexed images
The open source software Bio7 is an integrated development envoronment (IDE) for processing and analysis of scientific data and images (mainly grayscale / indexed images). It has Image J 1.51 integrated for image processing. Bio7 allows extraction of data from images and analyis with a graphical user interface (GUI) using the programming language R (the R perspective of Bio7). In addition, the software has a flow editor that makes it possible to perform batch processing and to set up a documented / reproducible image / data processing pipeline. Further more, PyDev can be added to use Python scripts for Bio7. Because Bio7 is a rich client platform (RCP) based on the Eclipse IDE (see the page programming on my blog for details), some Eclipse plugins can be added to Bio7.A less intuitive alternative is the open source KNIME Analytics Platform with KNIME image processing (KNIP) and other image processing plugins that were contributed by the community. The advantage of KNIME is that also plugins for drug discovery data mining and molecular structure / reaction drawing are available.